Happy New Year. We survived the season of Madness. It was good. Saw lots of friends, some from away, some from here but living away. Didn't over eat too much. Didn't get too much excessive stuff that we didn't need or want. The other one has been off since early December, and we have done some useful but mundane chores around the house over the past few weeks. Tonight, while tidying up my photos in the computer, I found some pictures of a gardening project I did last October and meant to write about but never had the time due to: work, craft fair madness, pre-Madness madness and just general all round madness.
It is still an experiment in progress, and finding the pictures made me go check on the actual experiment to see how it was getting along.So far so good, which is gratifying as I put a lot of work into this one.
Last October, I started taking apart the planters that the Town uses on the street in summer. One plant we always like to use for the planter boxes is ornamental sweet potato vine. They don't usually flower in Nova Scotia, but add interesting and full foliage to the planters. They come in lime green, bronze, and tricolour. I like the lime green ones the best, they really set off purple or blue flowered plants like heliotrope or verbena, and they are tough as nails for drought and wind and drunks. All of which we get on Main Street.
The down side is their price. A four inch plant retails for $4.99. I know we bought at least 54 last spring, that is $250+ just for one type of plant. They are expensive because they are grown by cuttings and our local nurseries can only buy plugs and pot them up because they are patented and you must pay a royalty to propagate them.
Last spring I put two lime green plants in each planter, and by fall they were huge trailing vines over the side of the boxes. As their name suggests, they make sweet potatoes. The lime green plants make pink ones. I'm not sure if they are edible, they are a cultivated variety selected as ornamentals and I imagine they are probably more starchy than tasty.
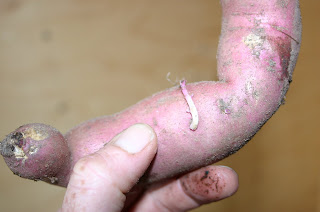
But plants that produce storage organs like tuberous roots (as these are), true tubers, rhizomes, bulbs and corms do so as a method for surviving a season when growing conditions are not favourable for the plant. So it would stand to reason that I should be able to store the sweet potatoes and use them to grow plants again next spring. Last year, I saved some in my basement as an experiment. I treated them just like I treat Canna rhizomes. I brushed the soil off them, let them dry a bit and then stuck them in a box in the basement and forgot about them. This worked for the Cannas, but come spring, the sweet potatoes were wizened up and not one grew when I potted them up.
This year, I got scientific. I started researching how to save ornamental sweet potato vine on the Internet, and what I found was that it was all but impossible to do. Every gardening forum and website suggested that the tubers were useless but you could take a cutting in fall, root it in water and grow the plant as a house plant. A colleague at work tried this and it worked. Sweet potato vine roots easily just by sticking it in a jar of water. The problem with this, is that I want to save lots and lots. More than I have room to grow in my living room certainly.
And then there is my dirty little secret...I kill house plants. I am useless with plants indoors. I am aware of the irony. I cannot seem to keep a plant alive inside over the winter. Mostly because I forget to water it, and unlike the dog and cat, (and the sweetie for that matter) who will tell you that they are hungry, a plant will go to its death quite uncomplainingly.
Logically, and biologically, a plant would not put so much effort into producing a storage structure unless it was able to use it for survival. So I concluded that someone had figured out how to do this for the edible type of sweet potatoes, because after all we eat those in Nova Scotia
all year round. I surmised that if I could duplicate the storage method for edible sweet potatoes, it would work for the ornamental ones as well.
I began by looking at agricultural websites and university research papers on sweet potatoes. I found a really good
research paper by Paul Sumner at the University of Georgia (where else would you expect research on sweet potatoes?) It went into a lot of detail of how they commercially harvest and store sweet potatoes. I learned that I did everything wrong. Sweet potatoes need a warm humid curing environment for several days, followed by a cool moist storage environment. The paper is very specific about the temperatures and humidity and duration if you care to read about it at the link above. The problem is that it describes the commercial methods, with big specially built facilities with computer controlled environments. I needed to devise something that would do the same thing, for cheap on a small scale.
First, how to cure them at 28 degrees Celsius and 94% humidity? The humidity would come from putting them in a large plastic garbage bag.
Their own moisture would keep the humidity high. The temperature was more of a problem, our house is a comfortable 18 degrees in summer most days because we are heavily shaded on the south and the house is super insulated with the windows shut. By October it is getting cooler outside but not so cool we want to light a fire or turn on the heat. At first I thought I should get an electric heating pad and cover them. The sweetie wasn't too keen on running a heating pad for 10 days continuous just for a crazy plant experiment. He came up with using the warm space on top of the fridge.
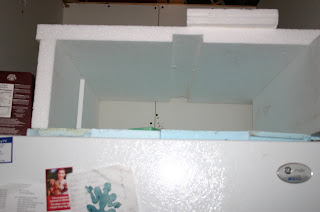
If you have room on top of the fridge it is good for all sorts. I have a friend that uses it to thaw frozen dinner rolls quickly. It is useful for rising bread dough, and I myself have used it to hasten germination of seedlings in spring. The compressor that cools the fridge has to expel heat somewhere, and usually it is out the back and rises to the ceiling. Even if the top of your fridge is not open, an enclosed cupboard above will be a few degrees warmer than the rest of the room.
The sweetie made a box out of 5 pieces of Styrofoam, 2 inches thick. We had this just lying around in the barn because we are in constant renovation mode and you never know when you night need some off cuts of Styrofoam. The bottom piece was square, roughly the size of the fridge top. The sides were 8 inches high, and hung out over the back of the fridge all the way to the wall. The top covered the sides to the wall also, and this way the heat got trapped into the insulated box. The front was cut to slot neatly into the rim made by the bottom top and sides, with a finger slot for opening.
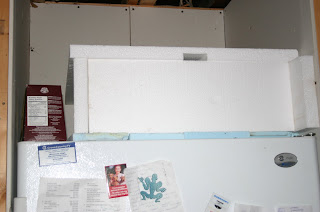
I was amazed to find that the temperature got up to 26 degrees Celsius in the box. The research paper suggested that a lower temperature would need a longer curing time, so I placed the sweet potatoes in the box and left them there for a two weeks instead of 10 days.
The curing is meant to produce a thicker skin on the sweet potato so it can be stored. When you dig them, sweet potatoes are easily bruised or damaged by the shovel, so treat them gently, more like a peach than a potato because any bumps or cuts will wound them and they will start to rot in the curing stage.

One bad sweet potato can spoil the whole lot, so check them frequently and take out any that are going soft or mouldy.
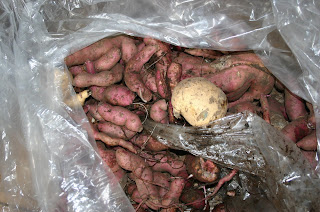
Once I was sure they were cured, my basement is a constantly cool 15 degrees, at 60% rH, perfect for storage. The paper suggests that storing them in crates covered with barely moist sand will help stop the dessication I experienced last year. We still have half a yard of sand left over from the electrical trench we dug to the garage last February, so I used that and occasionally remember to mist the top of the sand lightly to keep it moist.
It has been two months since I put them in the basement, and so far they look the same as the day they went in. If all goes well in spring, I will pot them up in the green house and have lots of reclaimed plants for the street planters next year.
 Once I bought emergency chili powder for the chili I was making, I realized I didn't have any extra bottles in the pantry. Off I went this week to the Dollarama for more bottles.
 One larger square plate cracked as it dried too much before I took it off the mould. Twice. One round plate worked OK but it was pretty boring to look at. One oval platter got stuck on when I forgot to dust the clay with cornstarch beforehand, and then the same oval platter stuck again even though I remembered the cornstarch the second time.
 I still have two more bowls and two more platters I haven't yet attempted, but I think I will stop trying to use any of them directly and make plaster molds first.


